Wouldn’t it be cool if you could track the number of visitors coming to your Shopify store every month, see where they come from, what page they visit the most, etc.?
It sure will! Google Analytics (GA) does just that. GA is an analytical tool from Google that lets you track key metrics on your website, such as monthly traffic, clicks, conversion and bounce rate, audience demographics, etc.
Can you connect Google Analytics on Shopify? How do you go about that?
This post will show you exactly how. We’ll also discuss some of the benefits of linking GA to your Shopify website. Let’s dive in!
What is Google Analytics?
Google Analytics is an analytic tool used by online merchants to track and record useful insights on their websites. It is a free platform owned by Google.
Google Analytics is important for the growth and success of your business because it gives you real-time data on your website traffic, customer behavior, customer demographics, profits and conversion. You’re armed with enough information to improve your business decisions.
Universal Analytics or Google Analytics 4?
Google Analytics has 2 properties for measuring metrics—Universal Analytics(UA) and Google Analytics 4(GA4). While the former is less effective and more elaborate, the latter has become more popular as it makes data tracking simpler and provides accurate data. Recently, businesses have switched to GA4 for its benefits and also because of its insightful information.
Let’s look at some of the differences between these two metrics and why you need to choose GA4.
User-Metric – UA uses a 2-user metric system–New User and Total User while GA4 uses a 3-user metric–New User, Active User and Total number of users. GA4 shows you the number of new and total users as well as the number of users who are actively engaged on your site.
Views – These two metrics share similarities in pageviews as they show the pages your user viewed. However, GA4 views combine page views and screenviews under the term “Views” while UA measures screen views in separate mobile-specific properties.
Conversions – For UA, you define the user action that you consider conversion as a “goal” and these goals are counted as one conversion even when a user completes the action multiple times in a session.
While GA4 conversion actions are termed “conversion-event”, it usually counts every instance of the conversion event; which means if an action is completed multiple times, the conversion will be counted as many times as the action was completed.
There are more significant differences between UA and GA4. If you’d like to learn more, read this.
How to Set Up Google Analytics on Shopify
Since Google Analytics is a Google tool, you need to have a Google account before setting up Google Analytics for Shopify. If you already have an account, you can skip to the next step. If you don’t, create an account on Google.
1. Sign Up for Google Analytics
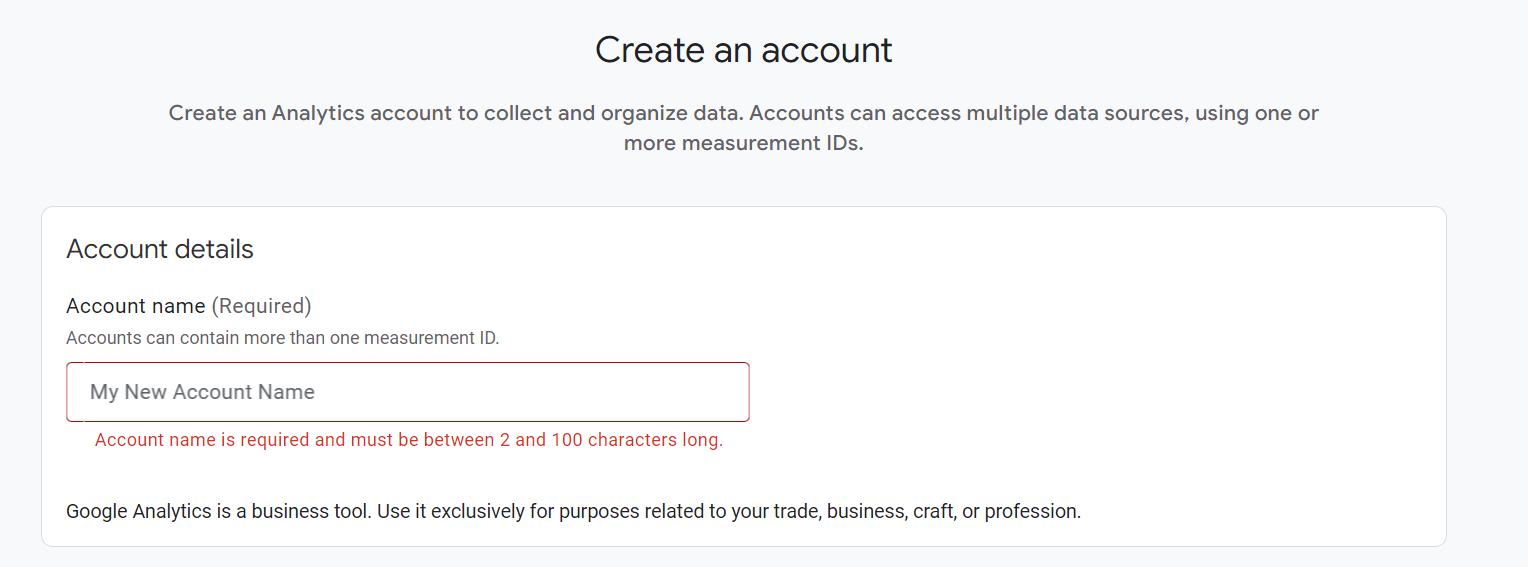
You need to sign up for Google Analytics to be able to install or use Analytics on your Shopify store. To get started, visit the Google Analytics Signup page to create an account.
2. Create a Google Analytics 4 Property
Next, activate your Google Analytics property. To do so, you must create your first Google Analytics 4 property.
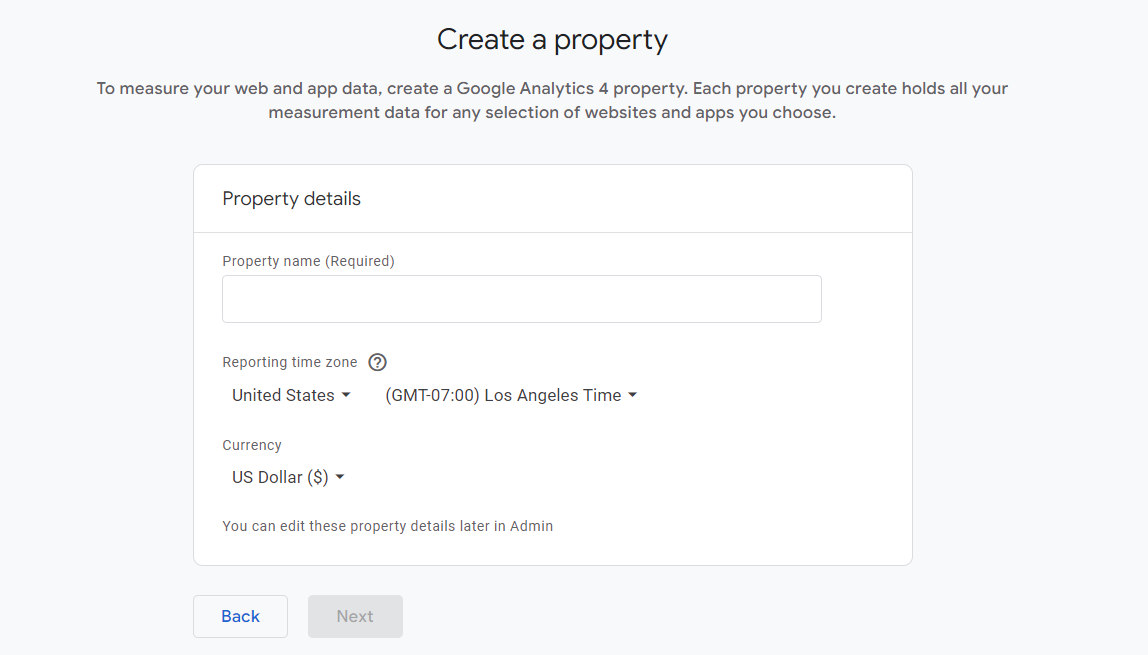
Here, you add the property name, reporting time zone and currency. Website visits will be reported in your selected timezone irrespective of the user’s timezone. Each property you create holds all your measurement data for any selected websites and apps you choose.
Next, add your business details and objectives, and select your data collection platform. Click to agree to Google’s terms and conditions to create an account.
If you already have a Google Analytics account, then you can create a new property by selecting “Admin” and then “Create Property” under the “Property” column or you can move your existing property into your Shopify store if there is any.
3. Add Google Analytics 4 Property Tags to your Shopify Store
To add the Google Analytics tag to your website, you need to install the Google & YouTube app from the Shopify app store.
Also, you can add it through the Shopify prompt displayed on your Google Analytics page with these steps:
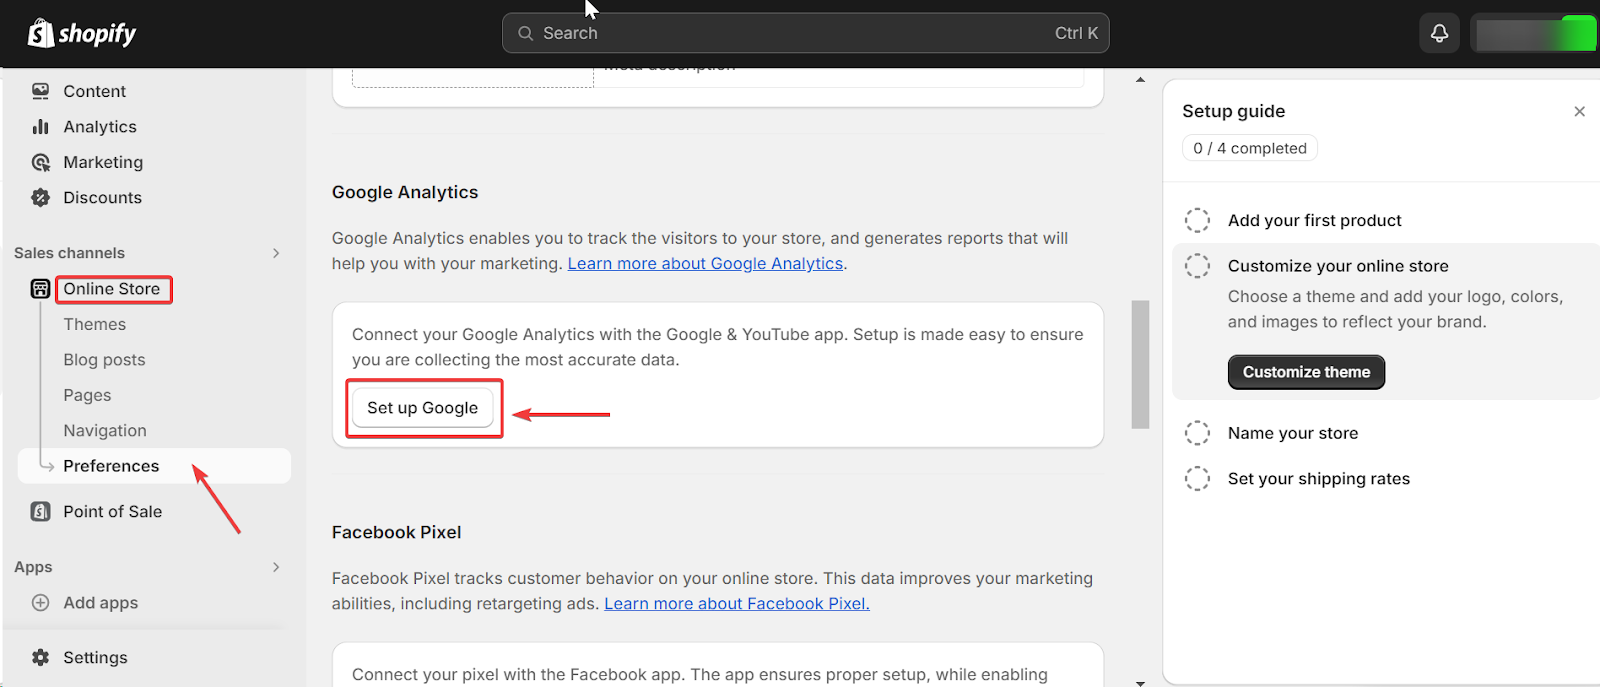
- On the Shopify Admin page, click on Online Store, then Preferences
- Click on the Set Up Google button to install the Google & YouTube app.
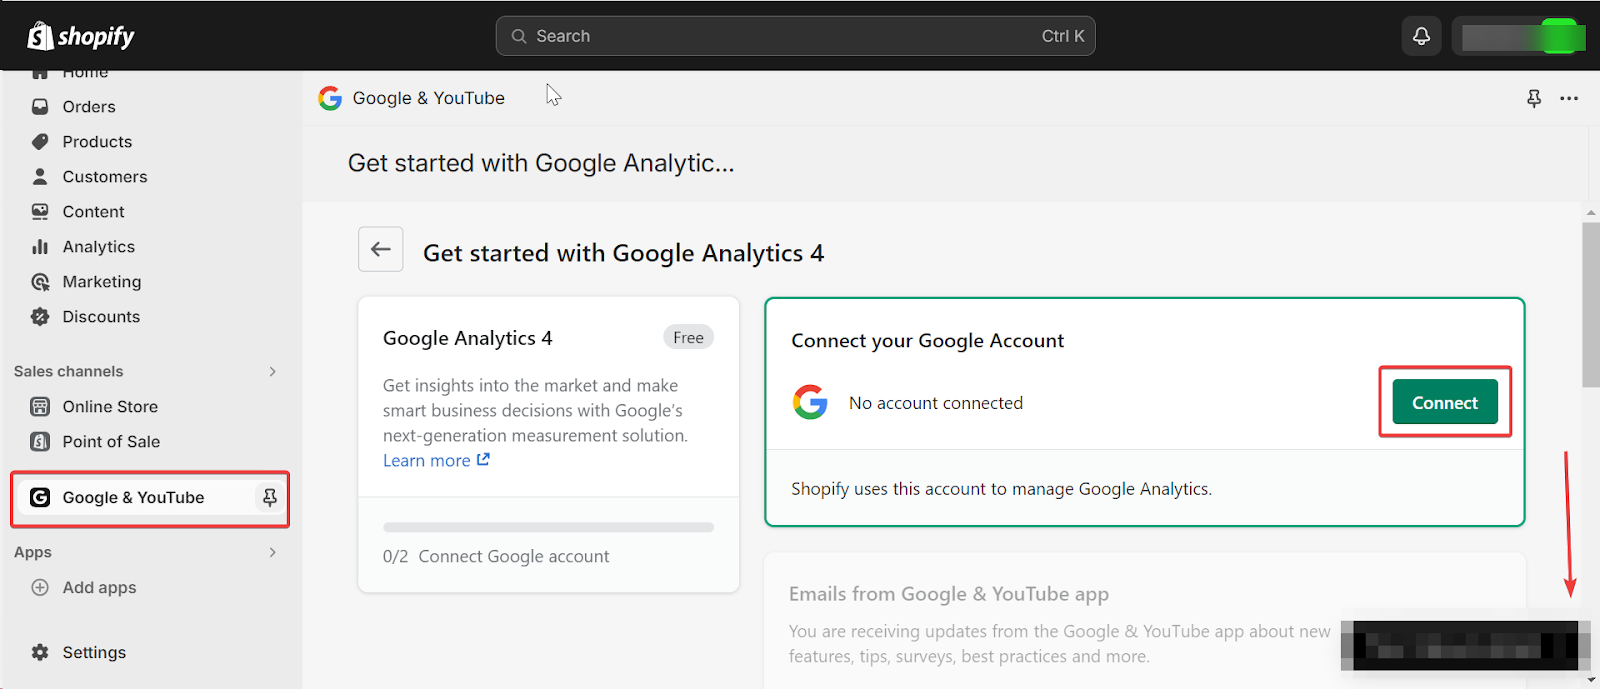
- Once installed, click on Connect your Google Account
- Select the Tag ID for the GA4 property you want to connect to your Shopify store.
- Click Connect your Google Analytics 4 property.
Although you can manually choose the event you want to track, some e-commerce events are tracked automatically.
4. Link Your Google Analytics Account to Your Google Ads Account
Link your Google Analytics 4 property to your Google Ads account and enable personalised advertising.
This way, you can analyze customer activity on your store that you can use to create audiences that will be available in your shared library on Google Ads. See this guide on how to link Google Ads and Analytics.
If you have been using Universal Analytics audience, you must migrate your audience to your Google Analytics 4 property.
5. Track your Conversions through events
Event is an important factor to Google Analytics because conversions are measured through events.
For example, you want to know how many customers clicked on a link on your site or the number of page views. These are events and are what you need to measure users’ interaction with your site and mark them as a conversion within Google Analytics.
How to Manually Setup Google Tag
Aside from connecting Google Analytics on Shopify through the Google & YouTube App. You can manually set up your Google Tag. Given its complexity, we only recommend this for advanced users.
Below are the steps to follow to manually set up your Google Tag on Shopify.
- Sign in to your Google Ads account.
- In the upper right corner, click the tools icon, and under “Setup”, click Google tag.
- Go to the “Configuration” tab.
- In the “Your Google tag” section, click installation instructions.
- On the “Installation instructions” page, select “Install manually”.
- In your Shopify store, click on “Online Store” > Themes, then click on the three-dot button on your active theme, then select “Edit Code” from the dropdown.
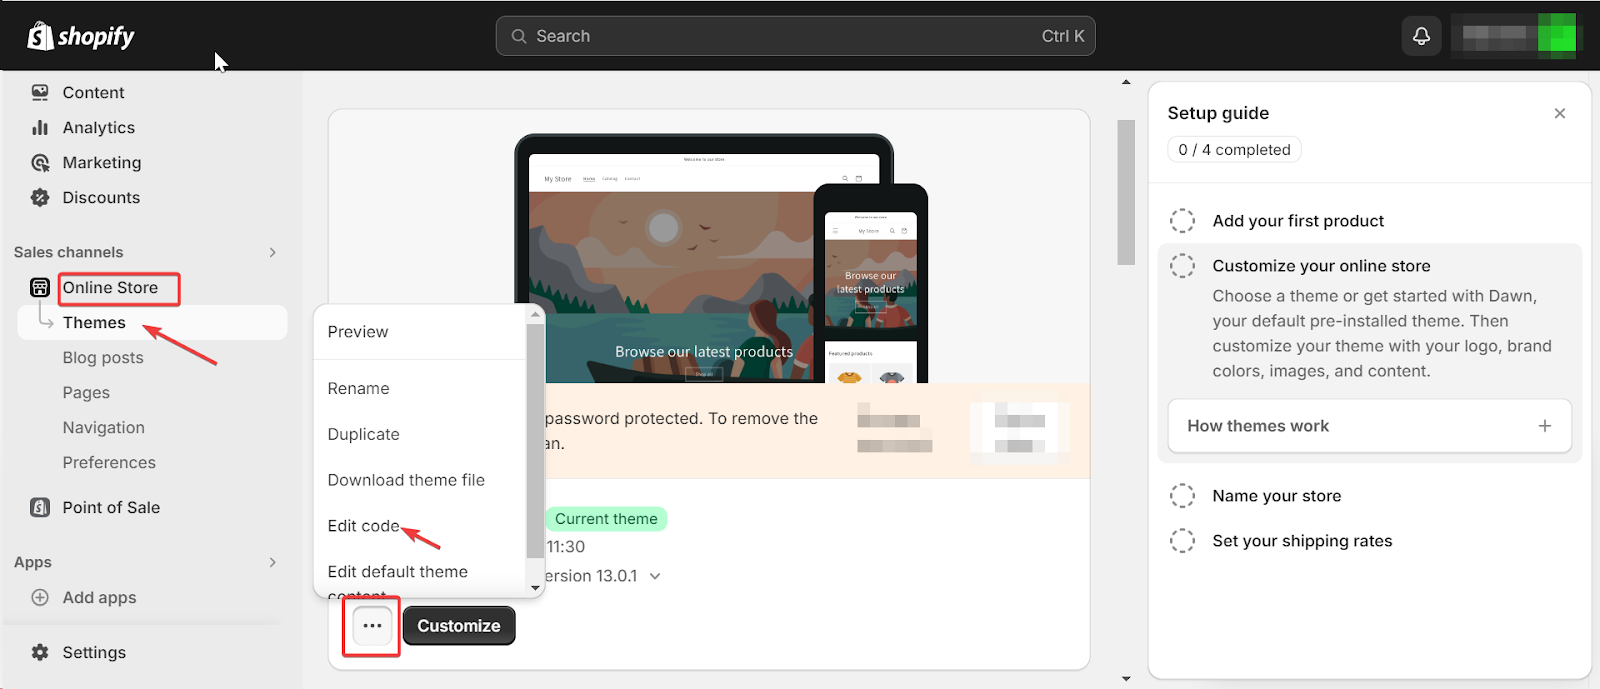
- Under “layout”, choose </>theme.liquid.
- In the theme.liquid file, confirm that Google tracking tags are not present. If you have a code on this page, that means you already have Google products installed. So double-check before replacing these.
- To establish a connection between your Shopify store and Google Ads, copy and paste the Google tag code below. After the <head> element, paste the code below beginning with <!– Google tag (gtag.js) –> and ending with </script>.
<!– Google tag (gtag.js) –>
<script async src=”https://www.googletagmanager.com/gtag/js?id=Tag_ID”></script>
<script>
window.dataLayer = window.dataLayer || [];
function gtag(){dataLayer.push(arguments);}
gtag(‘js’, new Date());
gtag(‘config’, ‘Tag_ID’);
</script>
- Click Save to finish.
Why You Need Google Analytics 4 on Shopify
One key benefit of GA4 is its flexibility and accurate reports and insight it gives. Plus, it provides platforms for both websites and mobile apps.
Also, it makes conversion tracking much easier and provides new metrics for more accurate engagement tracking. Aside from that, it also provides automatic tracking for certain events.
Having Google Analytics on Shopify helps improve your app campaign performance. It offers good performance benefits like faster app campaign ramp-up and audience management tools to help reach more users.
Important Google Analytics Reports for Shopify
Google reports are pivotal to analytics. As a beginner, getting familiar with them can take some time. Meanwhile, there are built-in reports that provide all the basic insight you’ll need as a beginner.
These reports are in the report categories in the menu on the left. They are broken down into:
Real-Time Reports: It updates you on the current happenings within your site. It shows you in real-time what page a customer is viewing, where they are from and how many active users are present on your site.
Acquisition: This briefs you on where your customers are coming from. The campaigns that converted them, the marketing channels and the locations of customers. Generally, it gives you a historical view of how customers are acquired.
Engagement: Shows how site visitors interact with your website and the popular pages.
Retention: Shows you the number of return visitors and provides data on their engagement on your site and purchasing behavior.
Monetization: This shows you how well your website properties are doing, from the number of people making purchases to generated revenues.
Conclusion
You should set up Google Analytics on your Shopify website if you want to grow your eCommerce business. That’s the key takeaway.
You can easily access valuable data and insights, such as your click-through and bounce rates, conversion rates, etc. With these insights, you can optimize your digital storefront for better sales and performance.
Setting up Google Analytics on Shopify is as linear as signing up for a Gmail account. We’ve attempted to cover the steps you should follow to create a GA4 account on Shopify.
Would you like to discover other resources we have for Shopify sellers looking to improve their store performance? See what we’re up to via this link below.