If you’re using Shopify marketing strategies such as Google ads, social media marketing, email marketing, and SEO, you’re on the right track. However, these strategies can be time-consuming and stressful to execute.
These strategies are often somewhat effective, but they can be time-consuming and stressful to execute.
But imagine having an advertising tool that helps you reach your ideal customers based on their likes, interests, and behaviours. How about a tool that optimizes your ad delivery by getting your message directly to your target audience and saves you money, time, and energy?
This tool is the Facebook Dynamic Ads.
In recent years, Facebook ads have become an effective customer acquisition strategy used by several eCommerce marketers and entrepreneurs.
Shopify advises store owners to use Facebook ads because of their efficiency and easy scalability by saying this:
“Social media is where people spend most of their time online, and Facebook is the most popular…so we encourage you to experiment with Facebook Ads to grow sales.”
In this post, we will be looking into what makes Facebook dynamic ads so popular. Also, we’ll walk you through a step-by-step process to help you set up and use Facebook dynamic ads to increase your sales on Shopify.
What is Facebook Dynamic Ad?
In very basic terms, the Facebook dynamic ad is a marketing tool that helps you display the right products to the right audience at the right time.
Have you ever window-shopped for a particular product on an eCommerce website – may be a pair of sneakers – then you returned to your Facebook feed, scrolled through, and saw an ad for the same pair of sneakers?
That is how powerful Facebook dynamic ads can be. They combine automation, retargeting, and machine learning to provide your target audience with relevant ads.
Here’s a short scenario explaining how it works:
A potential customer browses through your eCommerce products. During this process, Facebook will study the customer’s interaction with those products using a code installed on your website. This code is known as pixels.
After the study, Facebook will create what is known as dynamic ads.
Dynamic ads make it easy to retarget potential customers who have visited your website by allowing you to show them the products they indicated an interest in before leaving your website. This helps to reduce cart abandonment and boost your sales.
Benefits of Facebook Dynamic Ad
One method of targeting potential customers on Facebook is through regular Facebook ads. It requires creating single ads for each product and redirecting potential customers to the relevant product on your website when they click the ad.
However, this means that you would have to create hundreds of ads for the different products in your catalogue and tailor your ads to customers based on their position in your marketing funnel.
The problem with this strategy is that it can be time-consuming and challenging to scale. This is where dynamic ads become relevant.
Instead of spending your time creating hundreds of ads for your products, you can create one ad that dynamically changes based on the preferences of a particular customer.
Dynamic ads let you showcase specific products to the right audiences at the right time, making them a very effective solution.
These ads help you target potential customers that have already viewed your products. By showing dynamic ads to this set of customers, you increase your chances of driving more conversions.
Facebook dynamic ads also give you the chance to cross-sell and promote special offers to visitors on your website.
On top of that, when done correctly, you can use it to amass a lot of customers.
How to Use Facebook Dynamic Ads to Increase Your Sales
Step 1: Determine Your Goals
One of the most important factors to consider when employing any marketing and advertising strategy is metrics. Campaign metrics give you the information you need to know to understand how your campaign is performing.
If you fail to track the necessary metrics, your campaign may go in ways you didn’t intend. This could cost you a lot of money and energy with no result to show for your efforts.
Having said that, decide on what key metrics to track at the beginning of your campaign. This way, you’d be setting appropriate goals and keeping an eye on the campaign.
In determining your goals, you should consider what you are trying to achieve with the campaign. For example, a reasonable goal is to increase your sales.
If this is your goal, then you should monitor the following metrics:
1. Impressions
Impressions show how much people are viewing your ads. If it is low, not enough people are getting to see your ads. In this case, you may need to widen your audience.
2. CTR
CTR stands for Click-Through Rate, and it is a measure of the number of people that clicked through to your website via your ad link.
3. Bounce Rate
Your bounce rate shows the retention capacity of your landing page. A high bounce rate means potential customers are getting to your website but are not staying. To fix this, ensure your landing page copy clearly communicates the value of your offering.
4. Cost per Click
As the name suggests, this metric tracks how much you are charged when one of your ads is clicked by a visitor. This can give you an idea of how much revenue you get from each campaign.
5. Conversion Rate
As a Shopify store owner, your conversion rate is the most important metric you ought to track. It gives you an overall idea of how your ads are performing.
The higher your conversion rate, the better your ads are performing and the more money you are making.
Ensure you track, measure, and adjust your key metrics appropriately until you get your desired results.
Step 2: Set Up Facebook Ads For Your Shopify Store
Many people set up their accounts incorrectly, and that’s why many of them give up on Facebook advertising. Others get overwhelmed by the various ad options of Facebook to the extent that they don’t eventually run a campaign.
Before getting started, first ensure that you have set up your Facebook Business Manager account. This is where you will be running and managing your ads.
To set up your Facebook Business Manager account, visit business.facebook.com and click on Create Account. If you already have an account, simply click Log In instead.

You’ll need to provide your name, business name, email address, and Facebook business page.
The next thing to do is to create an advertising account or add an existing one. You can do so by selecting Business Settings under the Business Manager menu. After that, click on More Tools > Ad Account Settings.
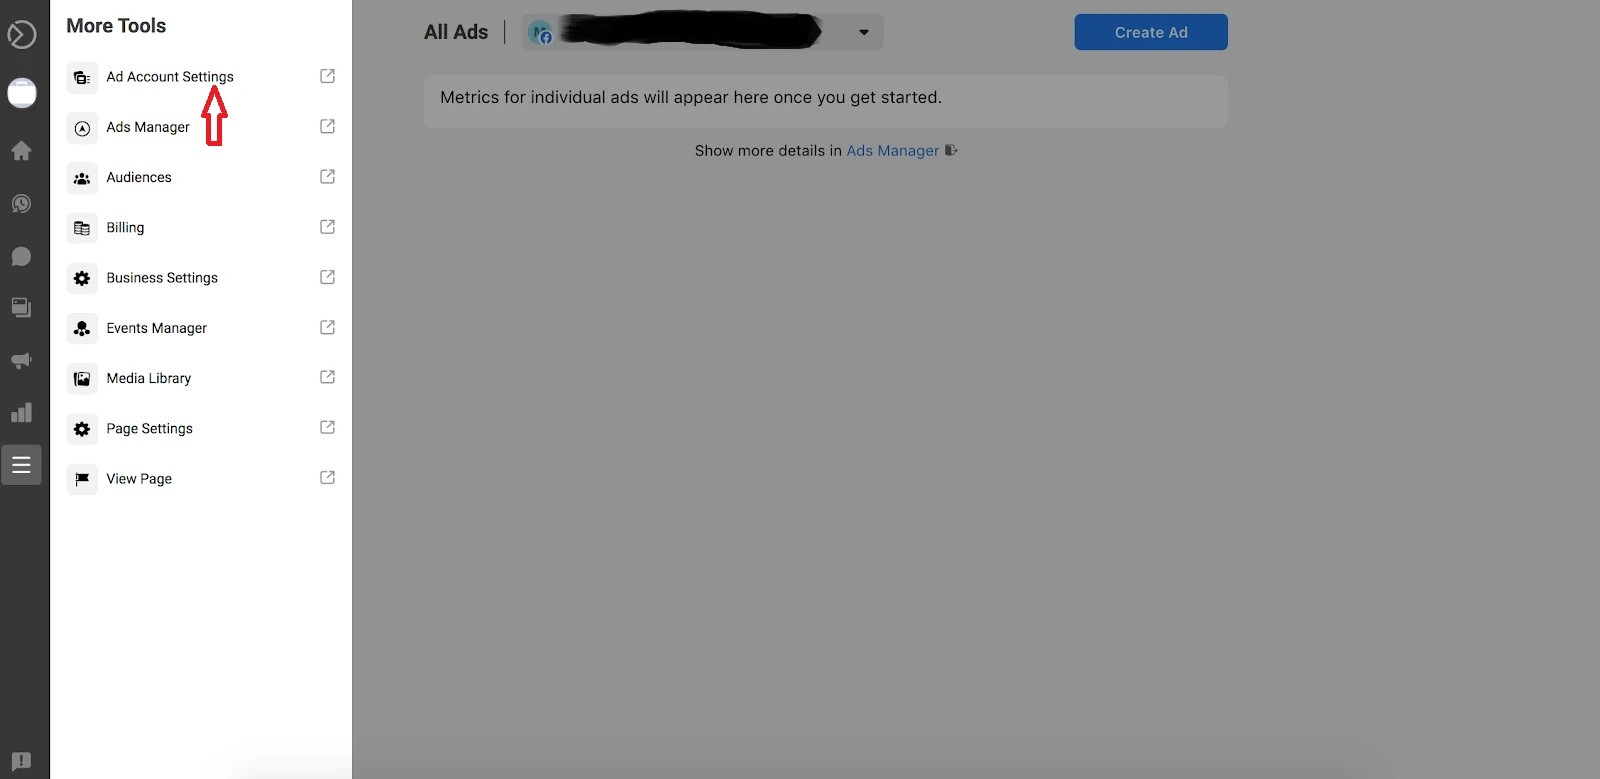
You will have the option of either adding an existing ad account, requesting access to an ad account, or creating a new ad account in a new window.
Step 3: Install the Facebook Pixel
To track the performance of your ads, you need to install Facebook pixel on your Shopify.
The Facebook pixel is a tracking code that monitors the actions of people who visit your website via your Facebook ads. It informs you of your ads’ performance.
Setting up Facebook pixels on Shopify is quite easy.
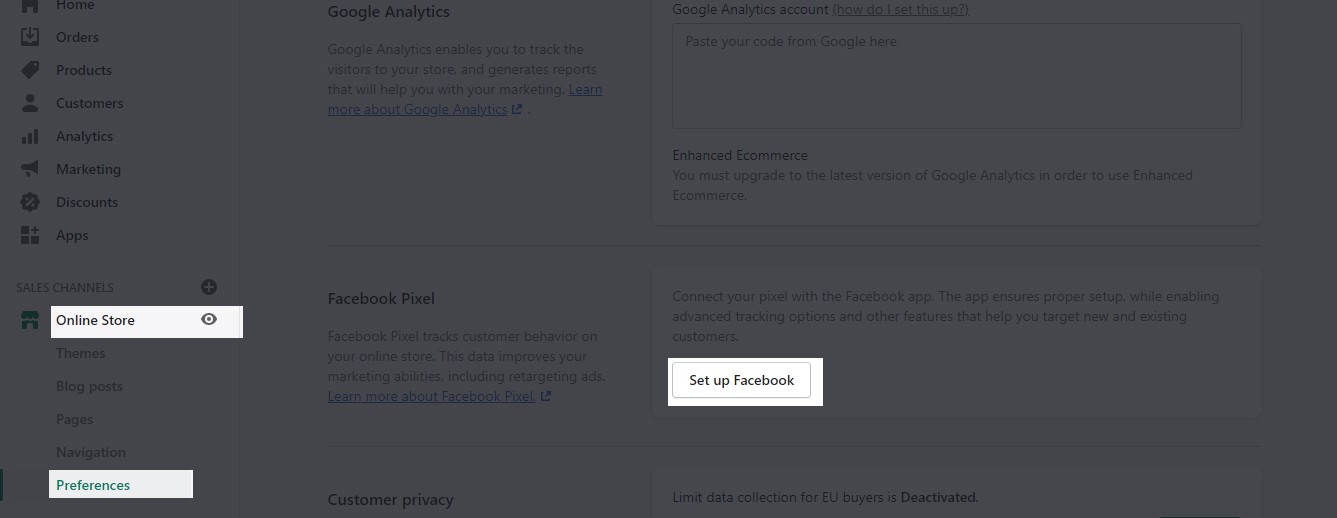
To do so, log in to your Shopify store, navigate to Online Store >> Preferences. Then in the Facebook Pixel section, click the Set up Facebook button.
The next steps are easy.
Within an hour of setting up the pixels, you should begin to see stats on users’ activity on your website.
Step 4: Create Facebook Audiences
Facebook has over a billion users around the world. But they aren’t all your customers. Hence, it’s important to target the right set of people with your ads.
Facebook allows you to show your ads to a particular set of audiences who will likely be interested in your offering, thanks to its Audience targeting feature.
The audiences section has many different features you can use in defining your target. These features can be broadly divided into two categories namely: retargeting and prospecting.
A. Retargeting
Retargeting is the process of showing ads to potential customers who have engaged with your business through your website, app, Instagram page, a video you posted on Facebook, etc. With a little encouragement, these people may be willing to make a purchase.
You may have browsed a website for a product, and when you scrolled through your Facebook feed, you started seeing ads for that product. That is retargeting, and it is a highly effective form of Facebook advertising.
You can use the Custom Audience feature to create retargeted ads. This feature gives you access to data that the Facebook pixel captures on your website.
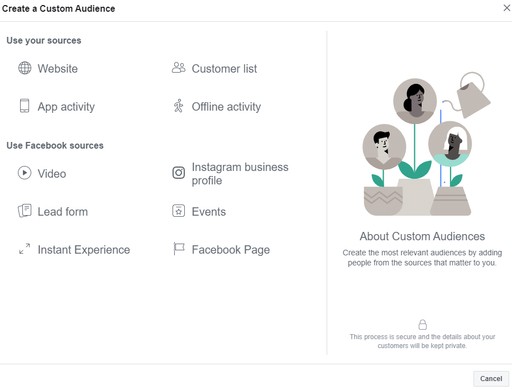
You’ll have a list of various sources you can draw from to create a Custom Audience. But, the three primary sources you will want to use as an eCommerce business are customer list, website, and Facebook sources.
1. Customer list
This source lets you upload different types of contact information that you’ve gathered from your customers in the past. Facebook then looks for them on its platform and shows them your ads directly.
Using a customer file to create an audience is effective for re-engaging your former customers with new products or reminding them to complete pending checkout processes.
2. Website traffic
Website traffic lets you create a retargeting list for your web visitors. This feature allows you to create different audience lists based on the actions your web visitors take.
The best people to target with this type of ad are those who visited your website in the past 30 days or those that added products to their cart but never completed the checkout process.
3. Facebook Sources
You can choose to retarget people who engage your business’ Facebook or Instagram page or ads. Retargeting diverse categories of users is an efficient way to direct prospects who may be interested in making a purchase to your website.
B. Prospecting
Prospecting is an even more effective way of acquiring new customers using Facebook ads.
However, creating an audience list from the billions of active users on Facebook can be a nightmare.
. To make this easier, Facebook provides two tools that you can use in finding your best potential customers:
1. Lookalike Audiences
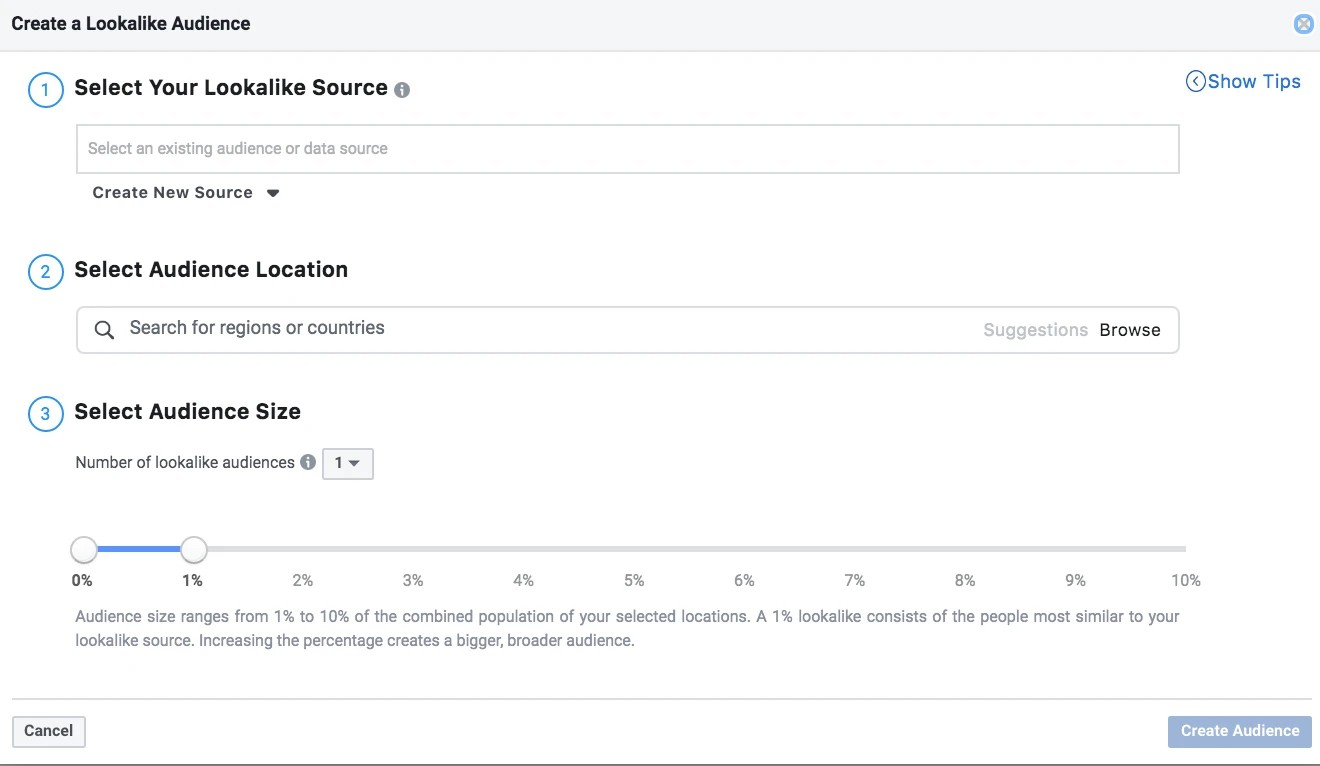
Facebook uses the data of customers you’ve gathered to find suitable prospective customers for your business. These prospective customers are then collated into a list called a Lookalike Audience. Basically, this list of prospects are Facebook users with similar qualities to your existing audience’s.
2. Interests, Behaviors, and Demographics
If you are unable to create a lookalike audience, Facebook can use your Shopify store users’ interests, behaviours, and demographic data to generate a list of prospective customers.
Interests refer to your users’ hobbies and can usually be determined by the movies they watch, pages they visit, etc. Behaviours, on the other hand, are based on actions they take on your website such as their purchasing history, while demographics cover their profile information.
Step 5. Choose Your Campaign Objective, Budget, Ad Placements, and Create Ad Sets
Dynamic Facebook ad campaigns usually consist of ad sets. To achieve your chosen objective for each campaign, you need to create targets and specific audience groups for these ad sets.
Campaign Objectives
Facebook lets you choose your campaign objectives from these three categories: brand awareness, consideration, or conversion.
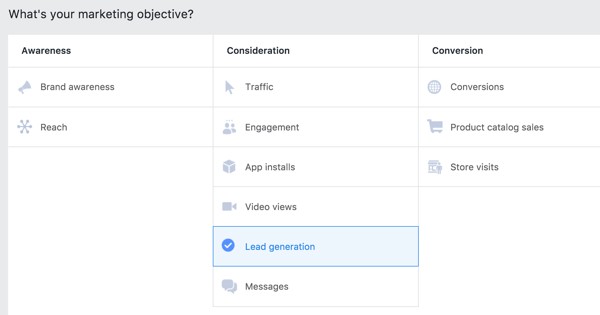
Ensure you pick the right objectives for the right audience to make the most of your ad budget.
Ad Sets
After choosing an objective, you are free to create multiple ad sets. With each ad set, you can select the audience the ads will target, your budget for the ads, and your ad placement.
Budget
You have two options when it comes to budget. You can either choose to set a daily maximum spend or set a lifetime budget while the campaign lasts.
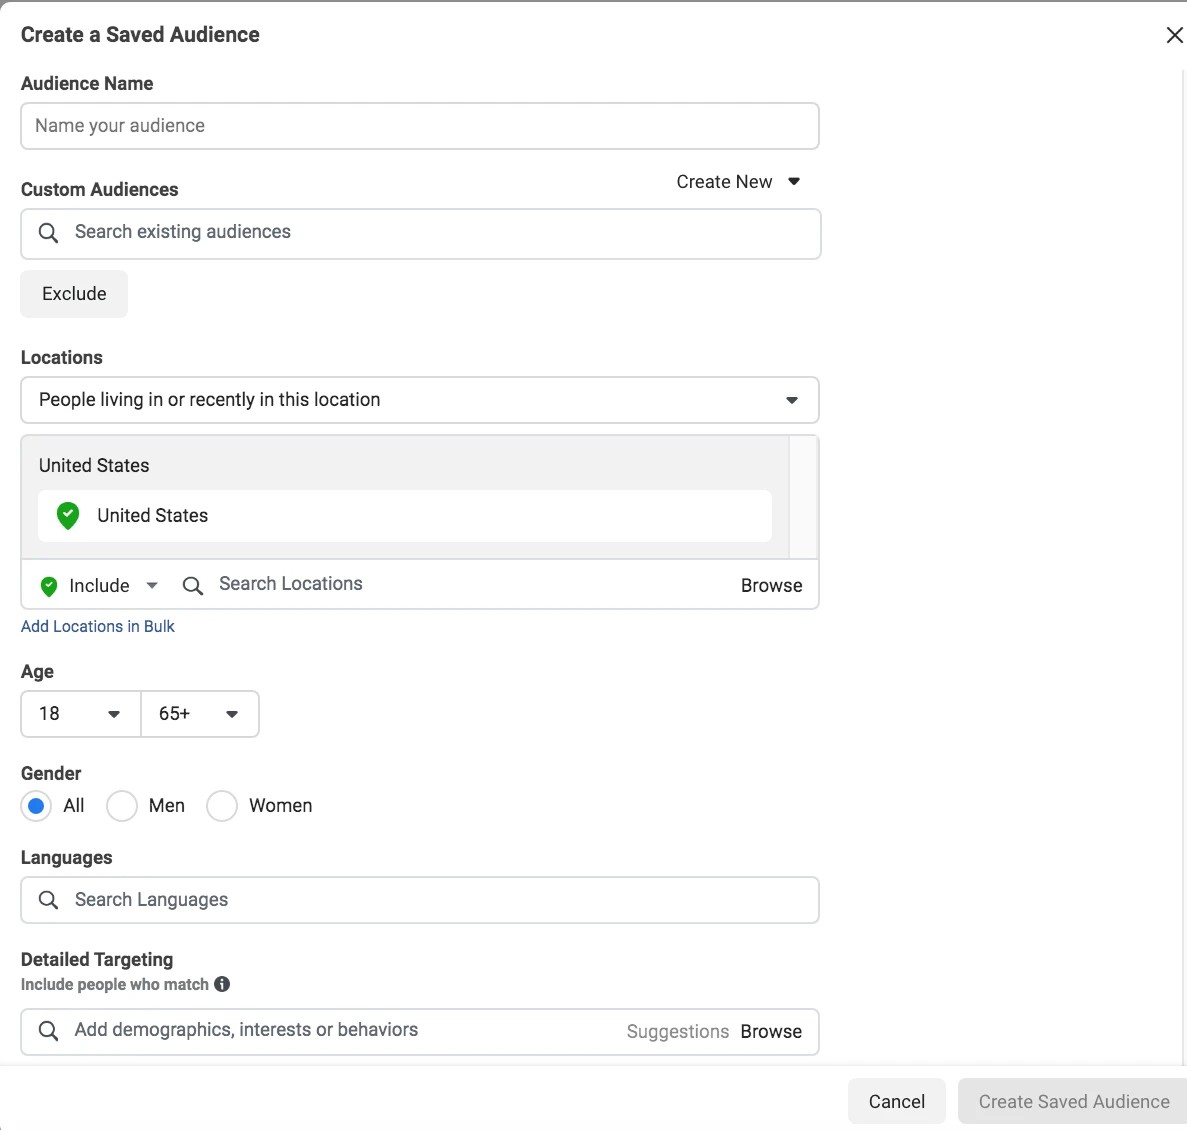
Audience
Like we discussed earlier, you can choose your target audience for each individual ad set based on different criteria like location, gender, age-range, etc.
Ad Placement
This step allows you to choose how and where you want your ads to be shown. For example, you can choose to make the ads appear on users’ Facebook/Instagram feeds, stories, and even on messenger.
Step 6: Design Your Ads For Shopify
It’s time to get started with creating the ads. Go to your Facebook Ads Manager page to get started. There are 5 ad formats you can choose from:
1. Single Image Ads
Single image ads are regarded as the standard for Facebook ads. They are cheap and easy to make. They are very effective in raising brand awareness.
2. Video Ads
Video ads give room for showcasing your product or brand to your target audience. You can either boost an existing video from your business page or create new video ads.
3. Carousel Ads
Carousel ads allow you to showcase a collection of images inside one ad. Users can view products in the carousels by scrolling through.
4. Dynamic Product Ads
Dynamic product ads show products to individual users based on their activities, profile data, and other factors with your Facebook Pixel. Using dynamic creatives will allow you to produce personalized ads more efficiently.
5. Collection Ads
Collection ads are somewhat like carousel ads. But aside from showing collections of your products, you can use collection ads to tell your company’s story or allow users to explore your business.
Step 6. Measuring Facebook Ad Success
Your job doesn’t end the moment your campaign goes online. You need to monitor and optimize your ads overtime to get the best results in terms of conversions.
Keep in mind that to get the best results, you might have to wait a while to start seeing meaningful results from your ads.
Don’t be too quick to immediately change or cancel a new ad because the results didn’t turn out the way you wanted. Instead, let the campaign gather at least 1,000 impressions.
This gives Facebook’s algorithm enough time to optimize itself and lets you make well-informed decisions.
You can track the necessary metrics using either Facebook Business Manager or Shopify Admin. Keep in mind that Shopify and Facebook don’t usually update their metrics at the same time. So, you may notice some discrepancies between both of them from time to time.
Bonus Tips for Increasing the Effectiveness of Your Dynamic Ads
Here are a few tips to help you increase the effectiveness of your ads.
- Use videos to bring your ads to life
- Upload your video directly to Facebook instead of linking it. This allows it to play automatically on a full-width display.
- Preferably, use a vertical or square format for ads shown on mobile screens
- Keep your ad copy short to catch your user’s attention early
- Include some text in your videos for people who may be watching with their phones on silent.
Conclusion
Integrating Facebook Dynamic Ads into your Shopify store marketing strategy is as simple as it gets. It also makes creating, monitoring, and managing marketing campaigns easy and effective.
Adoric provides a Shopify app solution that helps you increase your chances of converting your Facebook audience to customers when they land on your Shopify website. Ready to take it for a spin? Get the app now or simply see how it works.