The first time someone lands on your website, chances are, they aren’t ready to buy anything from you yet – and the reasons are numerous.
Maybe they will on their second, third, or even fourth visit. There’s still no guarantee. So, unless you give them a reason to make a purchase, you might never get their business.
For this reason, it’s your job to keep reminding them about your products and services each time they come and leave your website. How do you go about this? Facebook Retargeting!
Facebook retargeting allows you to re-engage potential customers as many times as you want until they convert. What’s more, retargeting works about 70% of the time.
If you’ve ever got the feeling that an ad was trailing you all over social media after visiting a particular website, that’s retargeting at work.
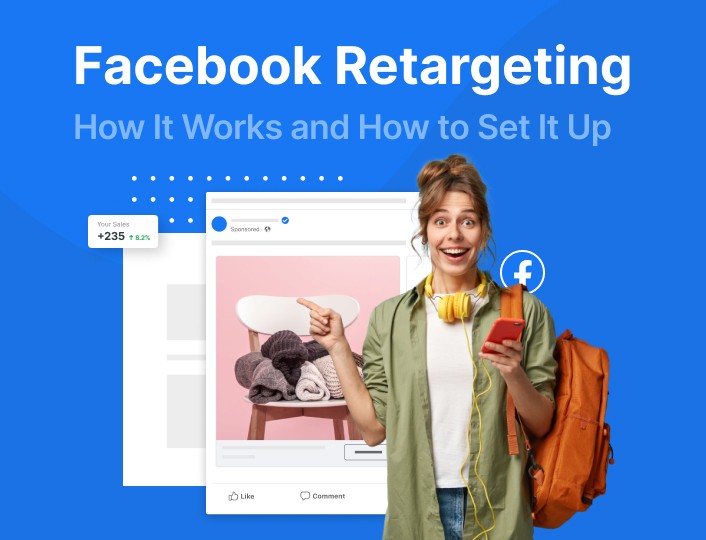
Want to know how Facebook Retargeting works and how to set it up for your business? That’s what this guide is all about.
Here’s an outline of what you’ll learn here:
- What is Facebook Retargeting?
- What is the Facebook Retargeting Pixel
- How to set up a Facebook Retargeting Ad campaign
- Best practices for setting up Facebook Retargeting
- Conclusion
Let’s get started with the basics: what is Facebook retargeting about?
What Is Facebook Retargeting?
If you have ever visited Udemy’s website without purchasing any course, one day, you might get an ad on your Facebook feed like this one.
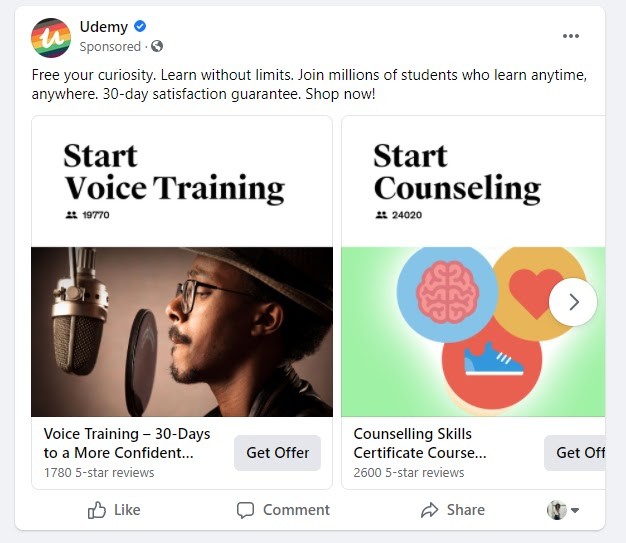
Kind of shocking, isn’t it? I mean how did that happen?
They simply ran a Facebook retargeting ad for people who visited their website within a certain period but didn’t buy any course. You happened to be one of them.
When people visit your website, it’s an indication that they are interested in what you have to offer. But visits don’t always result in conversions. So, you’ll need a way to keep reminding these visitors about your business even when they are far gone.
This is where Facebook retargeting comes in.
Facebook retargeting is a marketing and analytic tool that allows you to show ads to potential customers who have engaged with your business through your website, app, Instagram page, a video you posted on Facebook, etc.
How does Facebook Retargeting Work?
To understand how Facebook retargeting works, you first need to have an idea of what the Facebook pixel is about. It’s a tracking code that monitors the actions of visitors to your website. The next time those visitors open their Facebook feed, the code will cause your ad to appear on their timeline.
With Facebook retargeting, you can conveniently turn window shoppers into paying customers by convincing them to go to your landing page or website and complete an action.
So, if you’re looking to re-engage potential customers who left off your website without completing a specific action, Facebook retargeting is your best bet.
Forms of Facebook Retargeting
Facebook Retargeting is of two forms. They are List-based retargeting and Pixel-based retargeting.
List-based retargeting is less common and involves manually uploading a list of email addresses of those you want to retarget to your Facebook ads manager.
While it allows you to create a highly targeted audience, it’s more time-consuming. What’s more, if the email address you have for an individual is different from what’s on their Facebook profile, they don’t get to see your ad.
Pixel-based retargeting
If you don’t want to stress yourself with list-based targeting, pixel-based retargeting is where to look to. It allows you to target potential customers on Facebook based on the action they performed on your website/app.
Want to know more about this fantastic retargeting tool? Let’s dive right in!
What is the Facebook Retargeting Pixel?
Imagine you went to a store, saw a pair of athletic shoes, and put it in your basket. However, you later discovered that you didn’t have enough money to pay for it. So you keep it back, leave the store, and think that nobody saw you.
What if the store had a hidden camera that records what happens all over? And probably had a way of contacting you? That store will probably come for you – phone calls, emails, texts all reminding you about your incomplete purchase will flood your phone.
That’s exactly how the Facebook retargeting pixel works- it monitors and records what happens in an online store. After which it goes after visitors that left off without converting.
Here’s how a typical pixel code looks like on the backend of a website:
![]()
The Facebook pixel is a Javascript code that you or your web developer puts at the backend of your website to track the activities of your visitors.
It’s an analytic tool and helps you report data from your website to Facebook for your retargeting campaigns. In most cases, you can simply copy it from your Facebook ad manager and paste it into your website if you have access to your website’s code. Want to know how? I’ll show you shortly.
But first, it’s important that you get a fair idea of why the Facebook retargeting pixel is paramount to the success of your ad campaigns.
This piece of code monitors quite a number of “events” on your website and stores them back to your Facebook ad manager account. Events are actions visitors take while on your website. They could be any of the following:
- Views your content
- Makes a search
- Adds to Cart
- Adds to Wishlist
- Initiates Checkout
- Adds Payment Info
- Makes a purchase
- Signs up to your form
- Completes a registration, e.g., register for a webinar
Now that you’ve understood how the Facebook Pixels works, hopefully, it’s about time I showed you how to use it. Buckle up!
1. For Retargeting Your Website Visitors
Building an audience for Facebook ads usually involves defining several criteria: age, gender, location, population size, etc. However, with the help of the Facebook pixel, you can simply target web visitors who visited a particular page or took a desired action on your website.
This way, you can directly target people who have shown interest in your business without wasting time creating a random list of Facebook users.
2. Building Lookalike Audiences
What if you wanted people who have never visited your website before to see your ads on Facebook? The retargeting pixel can help, too. It can help you find potential audience who share the same interest and characteristics as those who have previously visited your website.
But you need to first set up what Facebook calls a Lookalike Audience.
To help you better grasp what a lookalike audience is about, let me make an illustration.
Let’s assume that you just put out an ad for a webinar. At the end of the day, you got 100 people to sign up.
If they were mostly male web developers between ages 18 to 32 and live in Germany, this would be your ideal audience. So, it makes sense that other people with similar profiles to these people are likely to sign up for your webinar, isn’t it?
When you generate a lookalike audience, what simply happens is your pixel reports these data to Facebook. Facebook then finds users with similar traits and shows your webinar ad to them.
3. Tracking and Improving Conversion
The Facebook retargeting pixel also allows you to track conversions on your web page. This means you get the chance to accurately monitor your campaign’s performance without needing any external tool.
To do this, you simply need to install the pixel on the page you send your visitors to right after they convert.
For example, let’s say that you have a landing page that contains an opt-in form. This is the page that visitors get directed to after clicking your ad on Facebook. After filling the form, they once again get re-directed, but this time to a thank you page.
In such a scenario, the best place to install the tracking code is on the thank you page.
With the Facebook pixel installed here, you’ll be able to track how many visitors are converting and how much ROI your ad campaign is making in real-time.
Knowing how your ads are doing makes it easier to figure out how to improve your ad campaign and test different ideas to increase your conversion rate.
4. Creating Dynamic Retargeted Ads
If you run an eCommerce site with many products and lots of traffic, creating different sets of ads for different audiences will be a nightmare. The Facebook pixel, however, gives you a foundation that will allow you to create dynamic ads. It also lets you control the continuous use of these ads for various sets of Facebook users.
Dynamic ads look like this one I got in my Facebook feed after I went window shopping on Asos. It was a collection of items I might like to buy. Apparently, I got those suggestions based on the items I had viewed on their website.
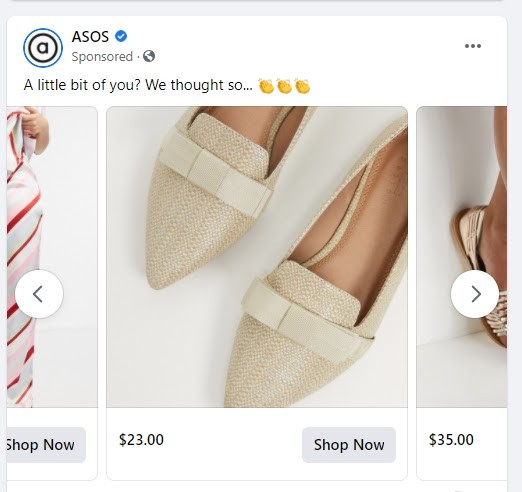
Asos can’t possibly create each of these tailored ads for every visitor that views items on their site. So, how did they pull this off? They simply used dynamic retargeting ads.
If you checked the backend of their website, you would see the tracking pixel like so:
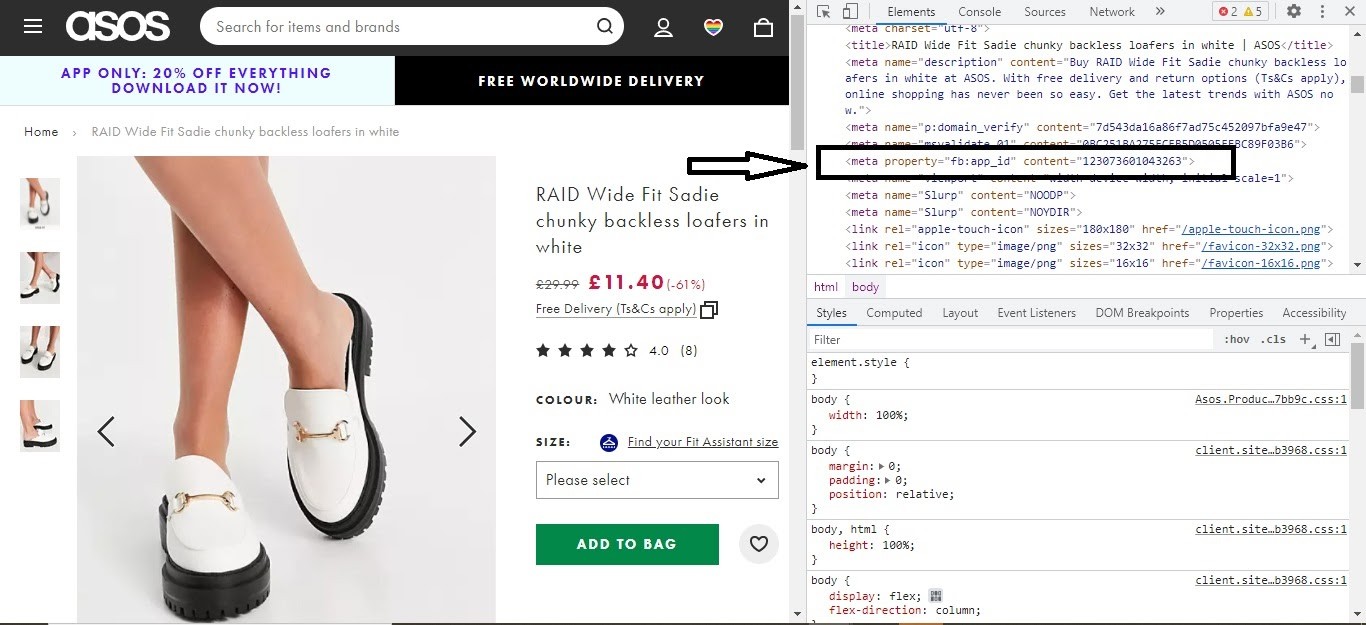
Dynamic retargeted ads, as the name suggests, are ads that allow you to automatically show relevant products or services to your audience based on their preferences, likes, intent, and actions while browsing your website.
Instead of manually creating an ad for each of the many items you have in stock, you only need to provide Facebook with a catalog of items on your website. After this, you’ll create a single continuous campaign for everything in your catalog. This way, whenever a visitor expresses interest in any item, your pixel reports this action, and Facebook automatically generates a relevant ad and shows it to them on their next visit.
That said, to run a dynamic retargeting ad, you’ll need to create a catalog and upload your product information. But if your store runs on, say, Shopify – or any of the eCommerce solution providers Facebook partners with – you won’t need to create a catalog.
Simply connect to your store and follow the directions to import your items to Facebook. Some of Facebook’s partner platforms are Shopify, BigCommerce, WooCommerce, Ced Commerce, etc.
Without further ado, let’s get started on setting up Facebook retargeting ads.
How to Set Up A Facebook Retargeting Ad Campaign
Setting up a Facebook retargeting ad campaign isn’t rocket science. These easy steps will help you:
1. Install the Facebook Retargeting Pixel on Your Website
Thankfully, you already know what the Facebook pixel is and what it does. All you need to do is install it on your website.
Here are steps to creating and installing a Facebook retargeting pixel:
Step One: Create the Pixel
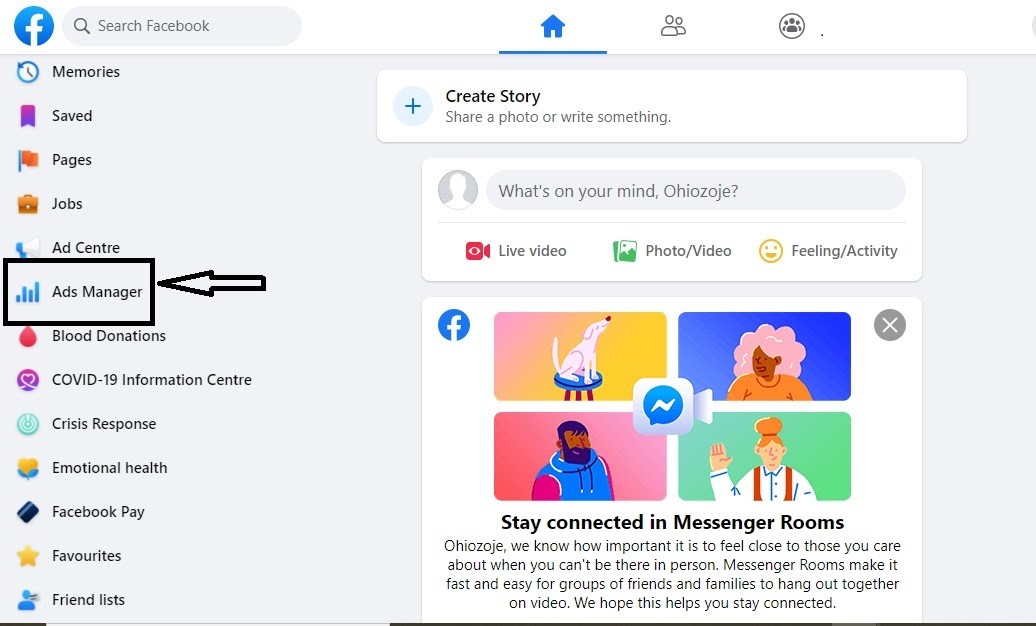
The very first step to getting started with Facebook retargeted ads is creating the Facebook retargeting pixel. To do so, sign in to your Facebook account.
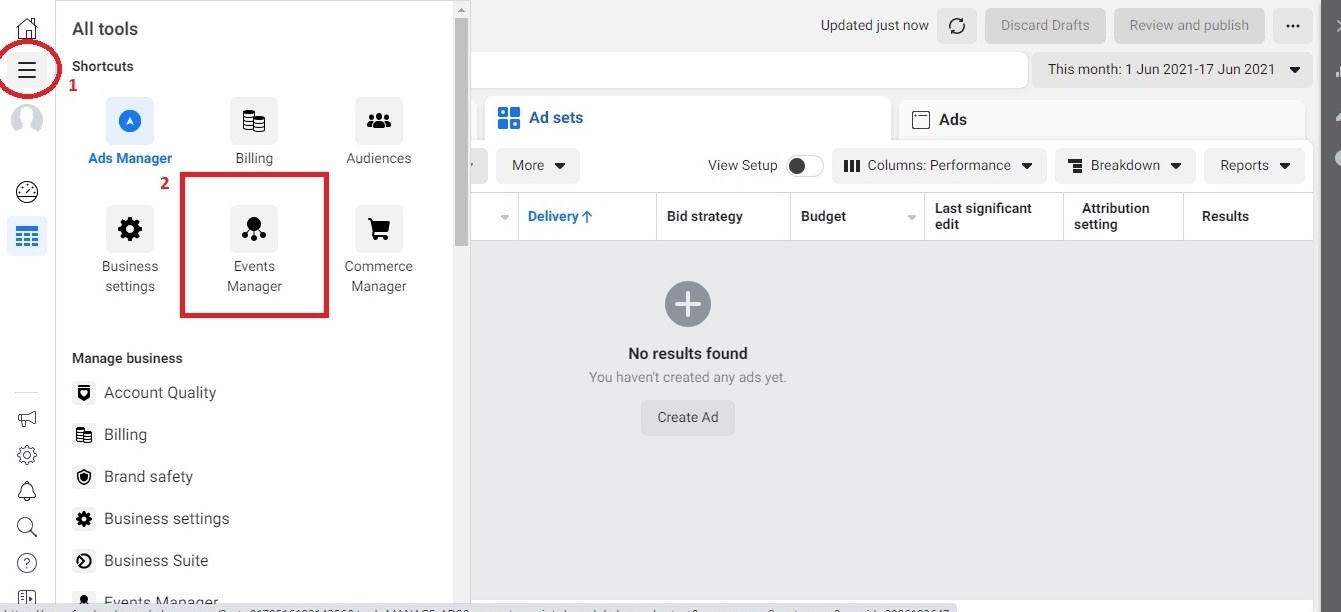
On the sidebar of your homepage, select Ads Manager.

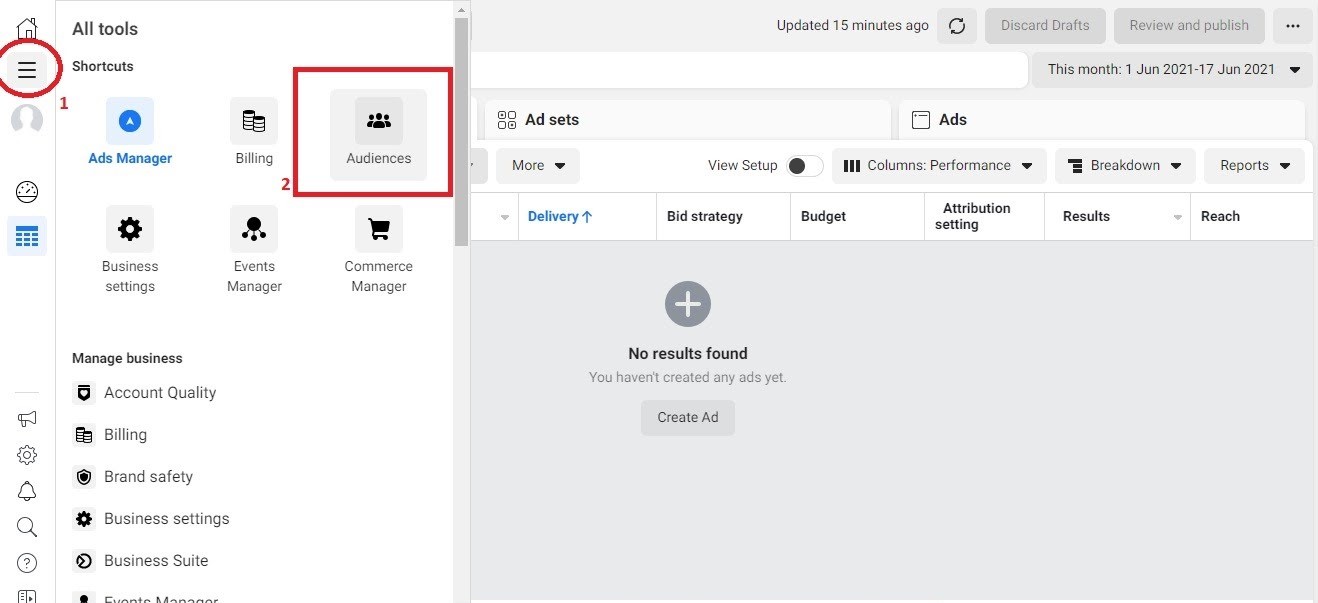
Next, click on the hamburger icon and select “Events Manager” from the box that pops up.
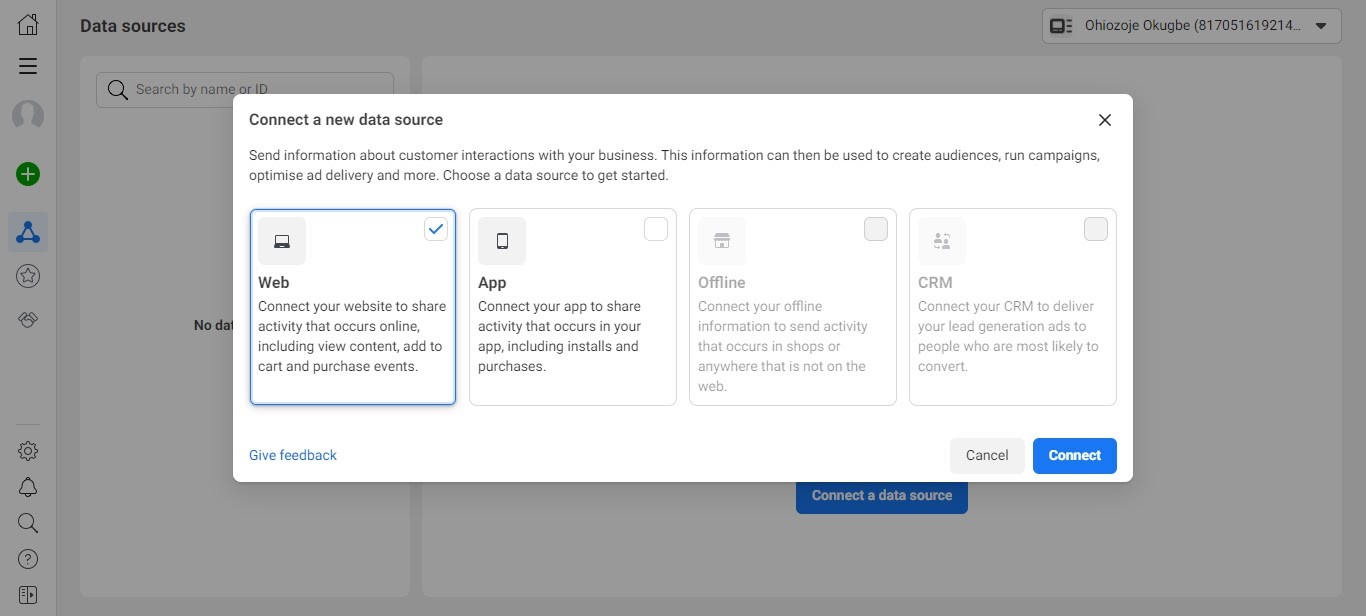
After that, click Connect a data source button like so.

Next, and select “Web” in the window that pops up.
When you do, another popup page would appear. Here, select “Facebook Pixel” and click “Connect”.
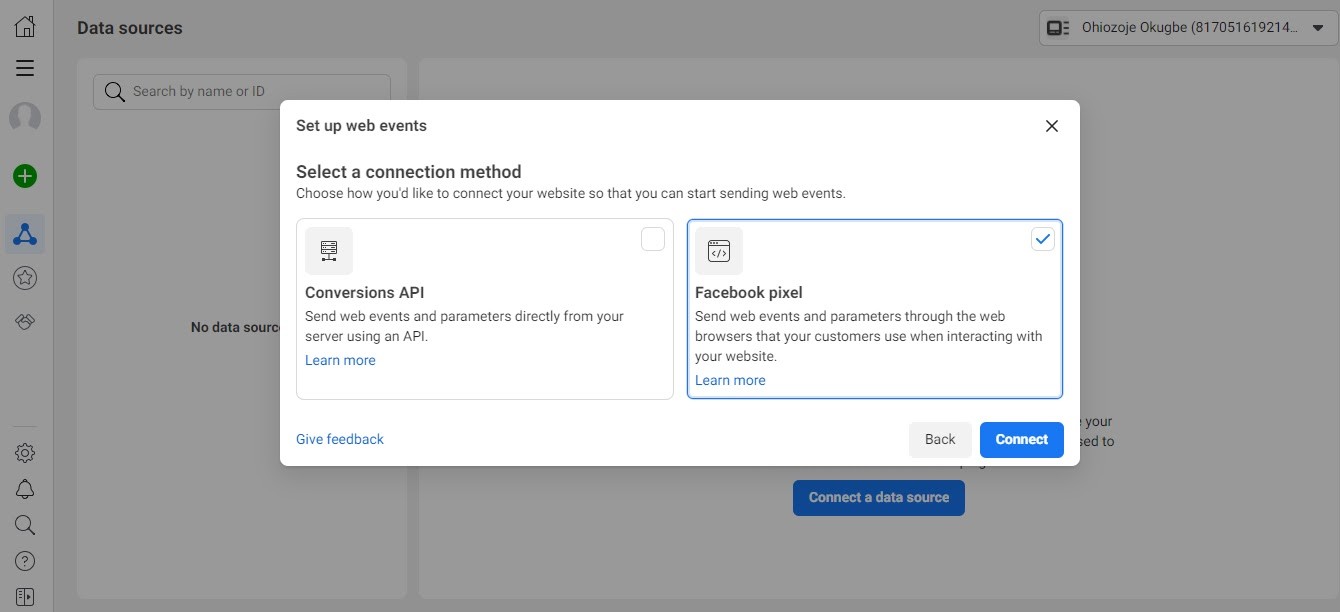
At this point, you may see a window containing general info on the Facebook pixel and how it works. Select “Continue”.
Next, this window will pop up and ask you to enter a name for your pixel and your website’s URL.
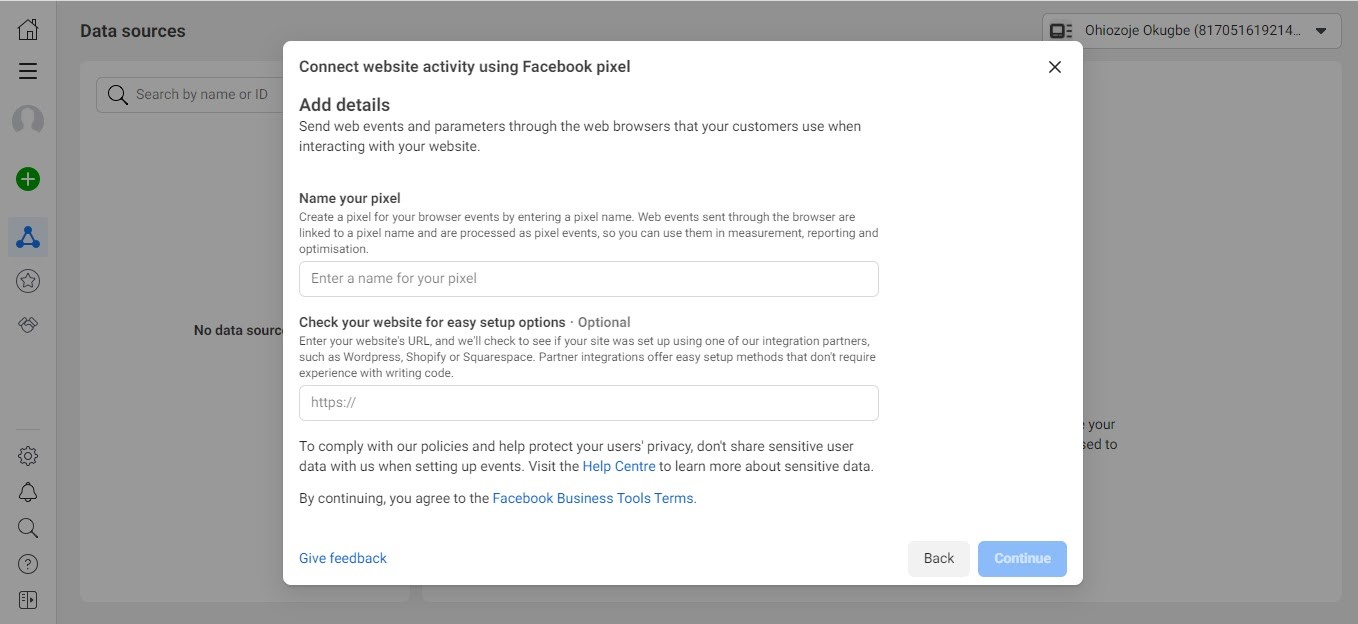
Once you’ve completed that step, your Pixel is now all set up.
Step Two: Installing the Pixel
You’ll be required to choose how you want to install your Facebook pixel; manually, via partner integration, or by emailing instructions if you wish a developer to do it on your behalf.
![]()
If you are installing manually, click Install Code Manually and then Copy code. This action automatically copies the pixel’s base code to your clipboard.
![]()
Next, head to your website and paste the base code into your header template. Better still, if your website runs on WordPress, there’s a plugin that lets you insert your pixel easily. It’s called the Insert Header and Footer plugin.
After pasting, head back to Facebook and click the Continue button. Doing this will take you to the Automatic Advanced Matching page. Turn it on like so:
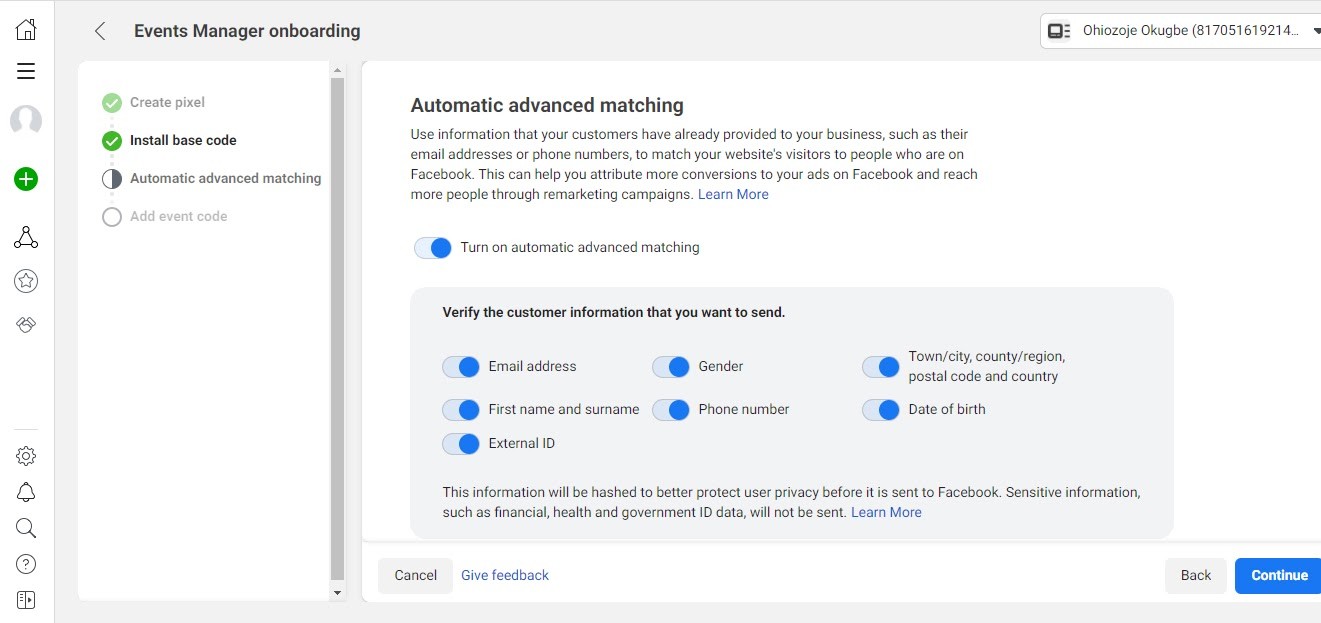
Once you do, it’ll allow you to choose the customer information you’d like the pixel to send to Facebook (emails, phone number, gender, etc.). Click Continue.
Next, install codes for the events you want to track. For example, you might want to track how many times someone adds something to their cart.
If you are installing via Partner Integration, click on the appropriate option as shown earlier. Select the partner from the list you will be provided with (e.g, Kajabi, HubSpot).
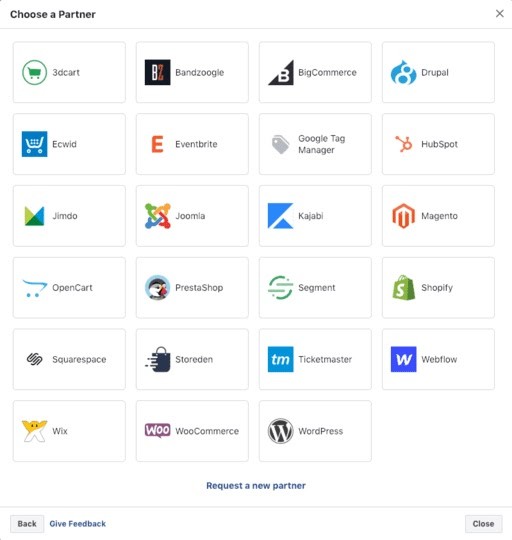
Click on See instructions and follow the specific instructions that follow. Note that instructions differ for each partner platform.
After completing the integration process, return to this page and tick the box to indicate that you have completed the setup. Then hit the Next button.
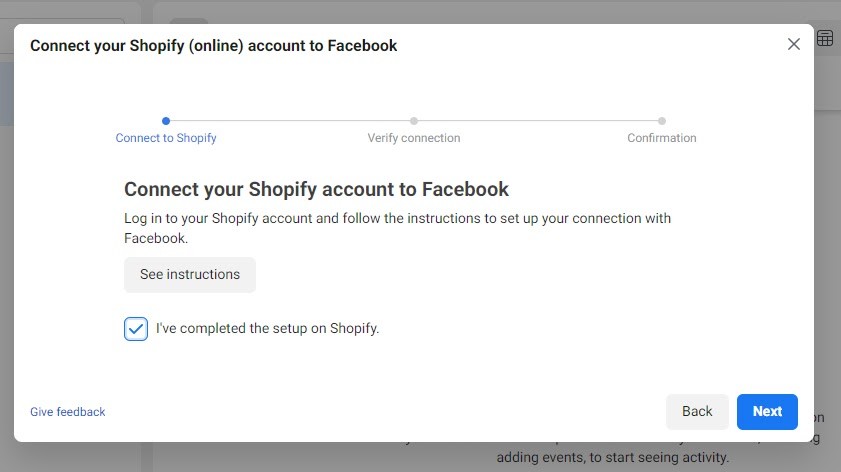
Next, enter your website’s URL in the space provided and click Send Test Traffic to allow Facebook to verify that your pixel is working correctly. Then, follow the remaining instructions to confirm your pixel setup.
![]()
2. Create a Custom Audience
After installing your pixel, the next thing you need to do is to tell Facebook the audience that you want to retarget.
Here, you’re not restricted to just demographics while selecting your audience. Instead, you can group your audience based on similar actions they’ve taken on your website or what stage of the customer journey they are currently at. For example, you may decide to target people who visited your website but didn’t make a purchase.
Here’s how to go about it:
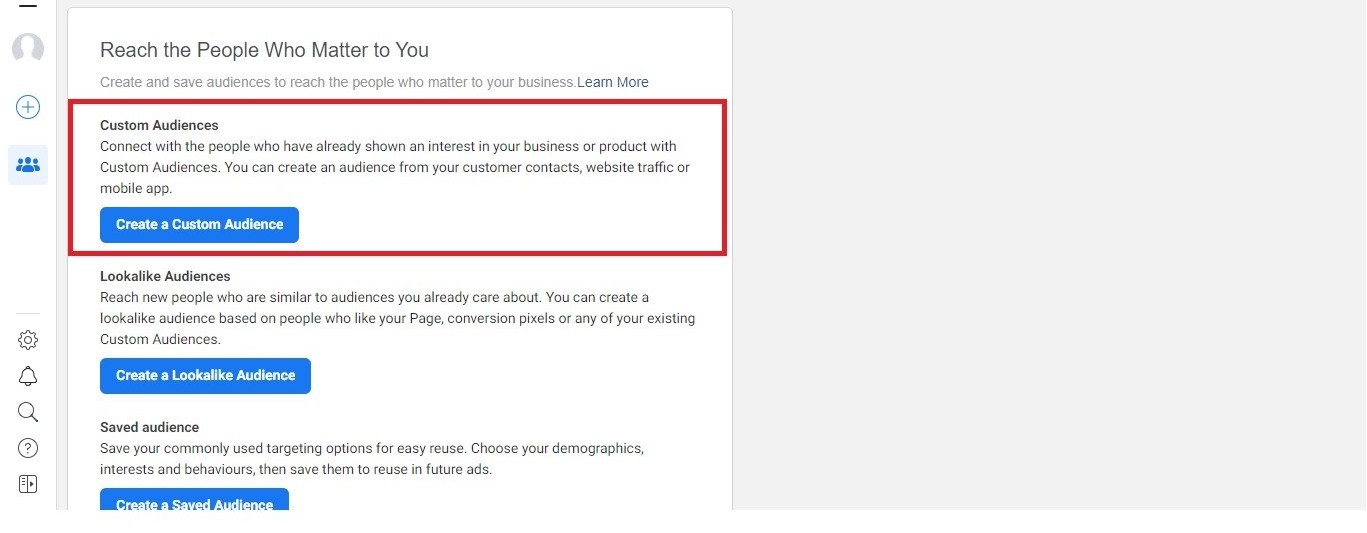
Sign in to your Facebook account and select Ads Manager from the sidebar of the homepage.
Select the hamburger icon and click on Audiences.
Click Create New Audience and then Create a Custom Audience
Next, you’ll be asked to choose your traffic source.
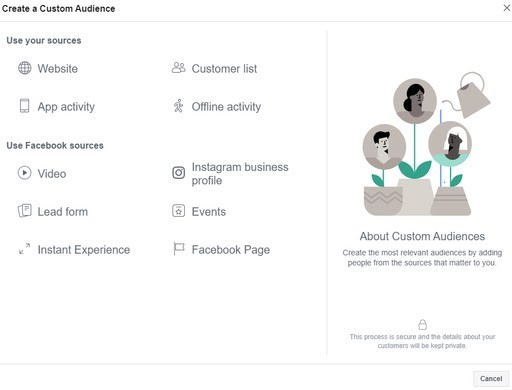
Website
If you have a pixel installed on your website, select this option to create an audience that consists of people who visited specific pages of your website. If you choose this option, Facebook will ask you to select specific criteria for your audience and a time frame that qualifies them for retargeting.
For example, you can decide to show your ad to visitors who searched for an item on your website within the last 180 days.
App Activity
If you have a mobile app for your business, this option is for you. But to effectively track users’ activities on your app for marketing purposes, you first need to install Facebook SDK to your app. You might have to work with your developer to have it installed.
Customer List
This option allows you to upload the details of your target customers in the form of a CSV or TXT file. This is an excellent option for you if you use a CRM service like Hubspot to manage your customer data. If you use MailChimp, you can also import your customers’ information seamlessly.
Offline Activity
Facebook also allows you to target audiences from offline activities like in-store purchases, phone sales, etc. You’ll have to manually record their details whenever they meet the criteria that qualify them for retargeting.
As your campaign runs, try to update it with any new information you get from your physical “events” so that you can accurately track which ones your ad campaign is responsible for. This way, you’ll know how your ads are performing.
Facebook Sources
Select any of the appropriate Facebook sources displayed if you want to retarget people based on their engagement with your Facebook or Instagram posts or previous ads.
3. Determine Your Campaign Objective
Next, you need to figure out the ‘why’ behind your campaign. What’s your reason for retargeting these people? What are you trying to achieve?
Your ad objective will fall under either of these three main categories: Awareness, consideration, and conversions.
For instance, if you’re retargeting your audience to generate leads for your business, you would want to create an ad that offers something valuable for free. Maybe an ebook or free course will do. You will find the possible list of objectives under the Consideration tab.
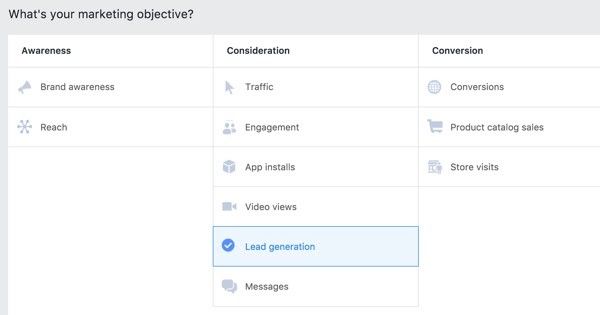
However, if you want to get abandoning visitors to complete their purchases, your objective will be different, definitely. In this case, your goal will be getting your visitors to convert. So, you’ll likely opt for an irresistible discount offer or a time-sensitive one.
Don’t skip this step no matter what. Facebook uses your objective to decide who to show your ads to.
4. Choose Your Audience
Remember the custom audiences you created earlier? This is where you choose which one you want to retarget.
If your audience size isn’t sufficient for Facebook to run your ad, simply return to the “Custom Audience” menu and increase the time frame you set as a criterion.
Once you do, Facebook will continuously monitor that audience to know if they are responding well, and make adjustments when and where necessary, automatically.
5. Choose Your Ad Placement
After designing your ad, it’s time to determine where you want to display them. Facebook can automatically determine the proper placement for your ad to maximize your budget.
If you choose to do it yourself, you could decide to place your ad in Facebook or Instagram feeds, stories, Messenger, search results, etc. If you choose to allow Facebook to do your ad placement, simply select “automatic placement,” and it’ll place your ad where it is likely to convert best.
Next, select the ad format you want to use, upload your ad, and make sure to write a compelling copy.
Your Facebook ad will be reviewed, but not to worry, it doesn’t take too long. After review, your retargeting campaigns will begin to show up to your chosen audience.
6. Set A Budget
You’ll want to decide on your budget for each retargeting campaign. You can either set a daily budget for each day the ad runs or a lifetime budget for the whole period the campaign runs for.
The exact amount you decide to spend here will depend entirely on your business. If you’re looking to test the waters, you can start small. You don’t want to throw a lot of money into it without first understanding your retargeting campaigns. When you find what works for you, adjust your budget accordingly.
7. Track Your Ad Campaign
The last step now is to keep a tab on your campaign’s performance? Thankfully, Facebook has tools like the pixel that allow you to track and measure your campaign performance in real-time.
Monitor your analytics periodically and make adjustments where necessary.
Best Practices for Setting Up A Facebook Retargeting
Do you want your Facebook retargeting ads to work effectively? These practical tips will help:
1. Segment Your Custom Audiences
Facebook allows you to segment your custom audiences. This lets you streamline your target audience to interested customers. By doing this, you’d be increasing your ad’s relevance.
You can segment your audience based on criteria such as age, occupation, gender, etc.
For example, if you sell female jewelry, your target audience could cut across millennials, middle-aged and older women. Yes, it’s the same products, but the same ad may not be effective across these three age groups.
Wouldn’t it be better to segment your audience into these three groups and show each group an ad that is more likely to appeal to them? By doing this, you’d be increasing your chances of getting more conversions.
2. Use Audience Exclusions
Audience exclusions help you maximize your advertising budget by allowing you to exclude a specific set of people from your custom audience. With this feature, your ad reaches a more specific audience who are likely to convert more.
Let’s illustrate a likely scenario where you can implement this tip:
Assume you want to get new customers from your ad. If you set it up without any exclusions, you’ll end up also targeting people who visited your website but already made a purchase. To get the best shot at acquiring new customers, simply exclude these people.
In this case, your objective might look like this: “visited your website but didn’t make a purchase.”
If you want to get those who have already purchased from you to buy more items, it’s smarter to create a separate ad for them. This will work better than boxing them all up with the former audience. Plus, no one likes to see an ad for an item they already bought from you. It makes your marketing look sloppy. And trust me, that’s not an impression you want to give a potential loyal customer.
3. Retarget People Who Already Interacted with Your Business
People who previously interacted with your business by liking your Facebook page, commenting on your posts, etc. are prospective customers. And they are the best to retarget.
Thus, when you retarget them, they are more likely to remember your brand and engage with your ad. They are also more likely to become loyal to your brand. It’s called retargeting anyway, so you shouldn’t be targeting just random people.
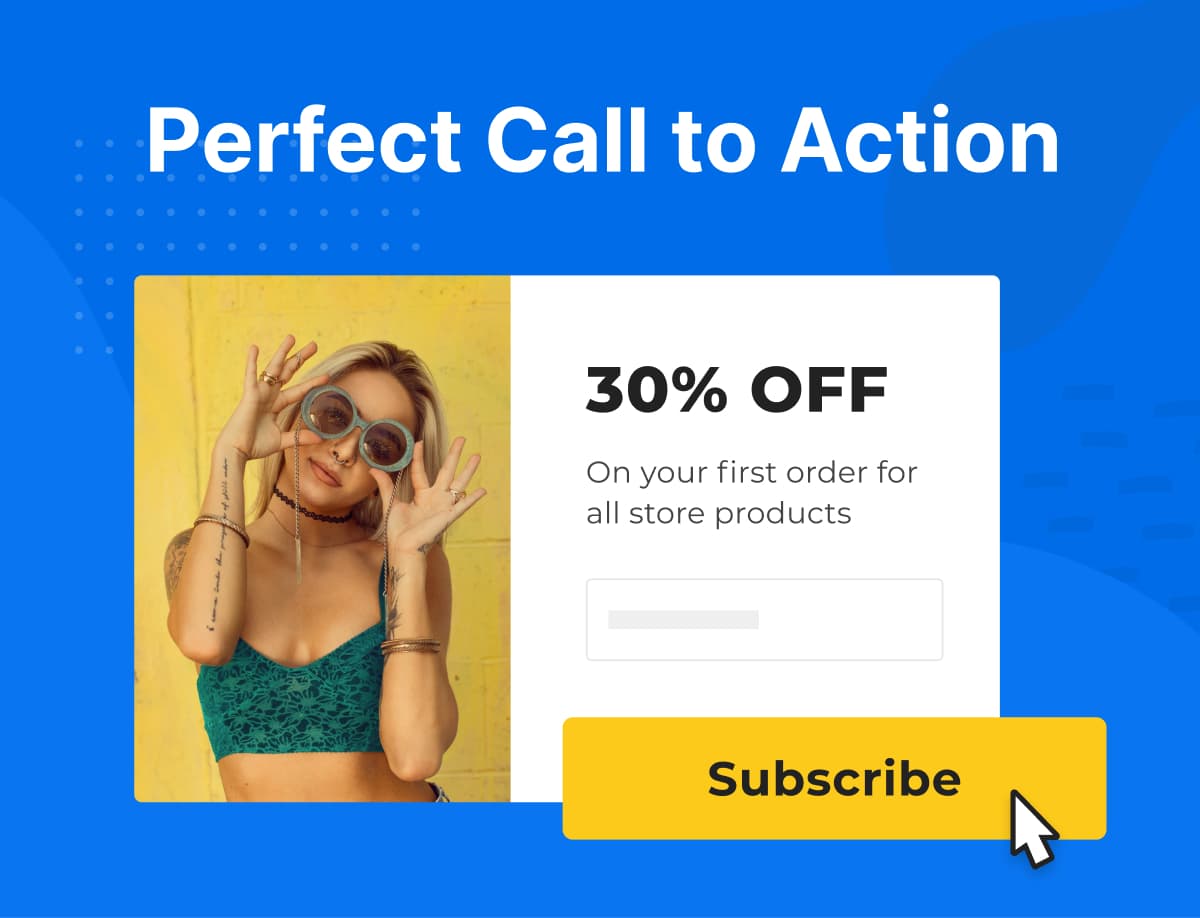
4. Give a Discount Offer
Most times, a juicy discount will motivate people to head back to your website and complete their purchases. So, how about retargeting your audience with a discount offer? Brilliant idea, isn’t it?
If you can’t afford to offer a discount right away, consider making your first remarketing ad a reminder that prompts visitors to complete their purchase. If you don’t get as many conversions as you’d like, you can introduce a discount offer.
5. Test Your Ads
In the world of marketing, guesswork doesn’t quite cut it. So, you have to keep testing elements of your campaign to see what works. Thankfully, Facebook allows you to carry out A/B tests on your campaign.
Elements you could test for are text fonts, headline copy, images, call-to-action copy, color, etc. The trick here? Make little adjustments at a time so you can identify the effect of each change on your campaign’s performance.
By testing your ads, you know how best to communicate with your audience to get maximum engagement and conversions.
Conclusion
Retargeting means you’ll be showing different ads to the same set of people. So, you’ll need to be consistent with your brand image and voice. This is how you’ll build the familiarity you need to keep your brand in front of the minds of your customers and prospects.
With the steps, tips, and tricks I’ve shown you here, I hope you start to re-engage your visitors to improve your engagement and conversion rates. Also, don’t forget to test your ads to be sure you’re putting your best foot forward.